
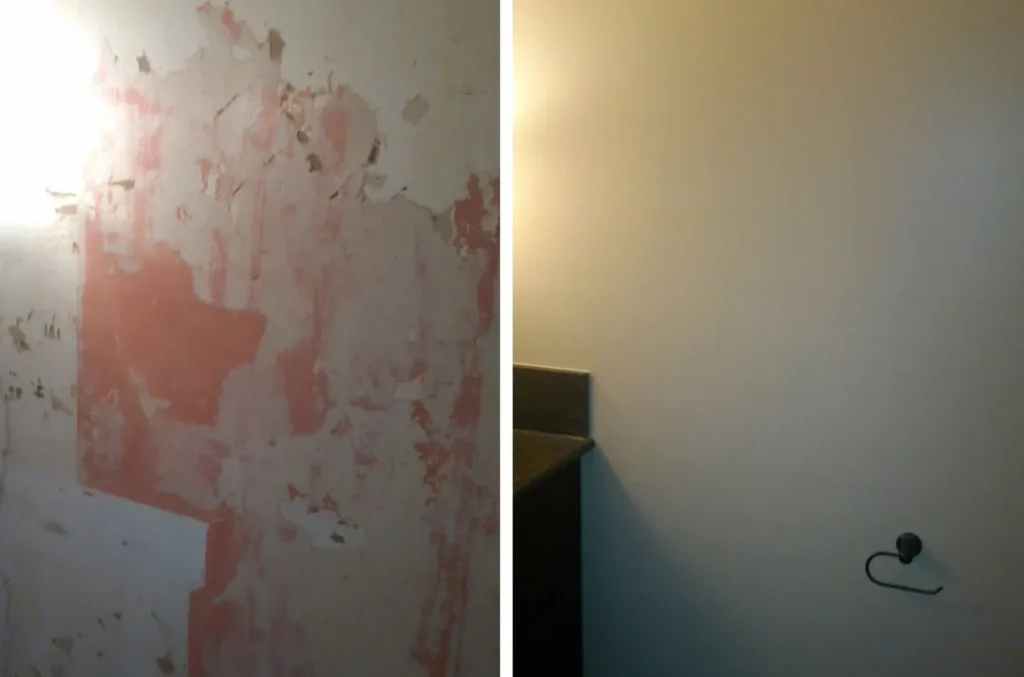
The Hidden Challenges Behind Stripping Wallpaper and Restoring Walls
Removing old wallpaper might seem straightforward, but it’s one of the most underestimated tasks in home renovation. Peeling away layers often reveals hidden damage—drywall tears, adhesive residue, and uneven surfaces—that can compromise your entire paint or re-wallpapering project. For homeowners in older neighborhoods across the Chicagoland area, where homes frequently feature plaster walls and decades-old layered finishes, improper removal techniques can lead to costly repairs and prolonged project timelines. Without proper prep, you risk mold growth, poor paint adhesion, and visible flaws that detract from your space’s final appearance.
This guide walks you through every phase—from identifying wallpaper types (vinyl, fabric-backed, or traditional) to selecting the best removal method (dry stripping, steaming, or chemical solutions). You’ll learn how to minimize dust and mess, protect baseboards and flooring, and assess underlying wall conditions. Most importantly, we’ll show you how to repair, prime, and prep surfaces so they’re smooth, durable, and ready for a flawless finish. Whether you’re updating a single accent wall or prepping an entire house, these professional-grade techniques ensure long-lasting results that stand up to local climate conditions and daily wear.
Remove Wallpaper Like You Know What You’re Doing: A Step-by-Step Guide
Tackling wallpaper removal the right way protects your walls and sets the stage for a flawless finish. Whether you’re upgrading a kitchen backsplash or prepping a living room, following a proven process can ensure clean results with minimal drywall damage. If it’s possible, try to remove the top layer by simply pulling it off. Start by identifying your wallpaper type—vinyl, non-woven, or traditional paper—as this determines your best removal method. If its possible try and remove the top layer by simply pulling it off. Heavy vinyls and other types can sometimes come off with minimal effort leaving only the backing or glue to remove. However, if the top layer is being stubborn you can try scoring it using a perforating tool (paper tiger, 40 grit sand paper, or a rolling spike) which can break the surface and allow the hot water with remover solution mix to penetrate. Warning: going too heavy with a perforating tool can leave marks all over the walls that will need to be patched over; unfortunately, this may be your only option with some projects.
Next, apply a mix of commercial wallpaper removal enzyme and hot water water (emphasis on the HOT water) using a pump sprayer or sponge, working in 3×3-foot sections to prevent drying. Let the solution sit for 10–15 minutes, reapplying as needed. Once softened, use a wide plastic or tempered metal scraper at a low angle to gently lift the paper and pull as much of it off as you can. You may have to go back over the area a number of times to get everything including the backing layer which may separate from the top layer. This is the part that requires a lot of patience and elbow grease so stick with it, some sections may go smooth and others will be stubborn and difficult. One other note, try to apply even pressure with the scraper—never force the tool—to prevent gouging, remember what you screw up you will need to fix!
After stripping, wipe down the walls with clean hot water to remove residue, then inspect for leftover adhesive. Allow walls to dry completely before sanding or priming. See section below for more detail.
Watch Out for These Hidden Pitfalls: Adhesive Residue and Wall Damage.
Peeling off old wallpaper often reveals more than just a blank wall—it can expose lingering adhesive, compromised drywall, or damaged plaster that can sabotage your final finish. In homes across the Chicagoland Area, especially older properties in cities like Geneva, Arlington Heights, or Batavia, layers of outdated wallpaper often leave behind sticky residues that prevent paint from bonding properly. To avoid peeling, crusty textured paste that was painted over, or bubbling later, thoroughly clean the walls with hot water and commercial wallpaper remover using a sponge. In some cases the glue may be very thick. I have found that using a coarse 3M scrub pad to loosen the glue and then wiping with a sponge works pretty decently to remove lingering glue.
Wall damage is another silent issue. Aggressive scraping can tear drywall paper or gouge the surface. Sometimes pulling the paper off can also pull off the top layer of drywall down to the brown paper layer or even the gypsum. Same goes for plaster, I’ve had chunks of plaster pull off the wall stuck to the back of the wallpaper. For damaged wall surfaces like this I use Zinsser Gardz, a high-performance, water-based sealer designed to bind, seal, and repair damaged, porous interior surfaces like torn drywall paper, old plaster, and encapsulate any residual wallpaper glue that might have gotten missed. It dries clear, creating a hard, moisture-resistant, and breathable film in 30 minutes, preventing peeling paint and bubbling joint compound. This process will save you massive headaches in the wall prep and painting phase ahead. If the walls are really bad I have rolled a second and even a third coat on to ensure wall surface stability.
Restoring Your Walls to Get a Smooth finish: A Step-by-Step Repair Process After Sealing the Walls.
Once wallpaper is stripped and the walls are sealed, the real transformation begins with repair, patching, and priming — critical steps that ensure a smooth, durable surface ready for paint or new finishes. Address imperfections using a lightweight spackling compound or joint compound. For small holes or seams, apply with a putty knife and smooth evenly. Larger areas may require drywall patch mesh for added stability. Always feather the edges to blend seamlessly into the surrounding wall. After drying, sand with 120-grit paper until smooth and wipe away dust with a microfiber cloth. When dealing with old plaster you may have sections where pieces may have pulled out or fallen out down to the lath or wire. In this case you should fill those deep holes with Structo-Lite (sold and home depot) which is a light weight filler for deep and wide holes in plaster. Then top it with regular joint compound for a smooth finish. If the walls are completely damaged top to bottom, then you’re looking at skim-coating the walls, which is a whole different animal than just patching some cracks and filling some holes. I plan on writing a future blog on this topic.
Finally, apply a high-adhesion primer to seal patches and create a uniform surface. This step prevents uneven sheen and ensures your topcoat goes on cleanly. Whether you’re in St. Charles, Glen Ellyn, or Naperville, proper prep translates to professional-looking results that last.
Wallpaper Woes? Your Top Questions Answered
What’s the safest way to remove wallpaper without damaging drywall?
Start by scoring the surface with a wallpaper scoring tool to allow moisture penetration, then apply a wallpaper removal solution. Let it sit for 10–15 minutes before gently scraping with a wide plastic or tempered metal scraper. Work in small sections and test a discreet area first.
How do I know if my wall needs repair after removing wallpaper?
Inspect for leftover adhesive, torn paper backing, dents, or soft spots. Run your hand over the surface—if it feels uneven or sticky, further cleaning or patching is needed. Residual glue can prevent paint from adhering properly, so cleaning with hot water and a chemical enzyme is highly recommended.
Can I paint over walls immediately after removing wallpaper?
No. After removal, clean, repair, and sand any imperfections. Then apply a high-quality primer to seal the surface and ensure consistent paint absorption. Skipping primer often leads to patchy results.
Are there non-toxic wallpaper removal options?
Yes—water-based removers are generally non-toxic as well as steamers but I personally am not a big fan of steamers they’re very slow and you end up having to wash and scrub the walls anyway. These are ideal for homes with children, pets, or in communities with green building standards. Always ensure proper ventilation regardless of method.
How do I dispose of peeled wallpaper and residue?
Collect debris in heavy-duty trash bags and dispose of according to local waste guidelines. Reuse drop cloths when possible, especially in areas with strict disposal regulations.
If I’m using water, how do I protect my floors and non-caulked wooden baseboards?
Cover the floor with a drop cloth first. Then apply tape to the wall just above the baseboards and connect plastic sheeting to the tape so that it runs about 3 to 4 feet out from the wall. I used to bring a pile of newspapers to throw down on the plastic which absorbed the water perfectly and then was easy to dispose of. However, these days newspapers have gone the way of the dinosaurs so I use absorbent pet pads purchased from Walmart, pull them open and cover the plastic, they absorb amazing amounts of water and then can be thrown out. Work your way down to the top of the tape. Once done, pull the tape off and, using a sponge and scraper, work off the last little bit of paper above the baseboard where the tape was. This will save your non-caulked baseboards from getting water behind them causing the wood to potentially warp and bend (not a pretty site I’ve seen it happen).
You’ve Got This: Finishing Strong With Confidence
Removing old wallpaper and repairing walls doesn’t have to be daunting—armed with the right techniques, even challenging jobs become manageable. You’ve now learned how to safely strip away stubborn coverings, identify common wall damage like tears or adhesive residue, and apply effective patching and smoothing methods for a smooth surface. Whether you’re in a historic home in Geneva or a modern condo in Arlington Heights, proper prep is your foundation for a professional-quality finish.
Start by gathering essential tools: a scoring tool, wallpaper remover solution, a steamer, putty knives, taping knives, and joint compound. Work in small sections, stay patient with textured or layered wallpaper, and always let surfaces dry completely before sanding or painting. Don’t skip the final inspection—run your hand over the wall to catch any ridges or missed spots.
Now that your walls are smooth and ready, you’re one step closer to a beautifully refreshed space. Take your time, follow each step deliberately, and remember that preparation directly impacts your final results. If the job feels overwhelming, especially with delicate drywall or large surface areas, consider consulting a licensed painting professional in your area to ensure long-lasting, high-quality outcomes. Your dream space is within reach—start prepping, stay confident, and enjoy the transformation.